|
Installation in aluminium hulls |
|
Installation in aluminium hulls |
General installation issues:
The most important installation hint is: NEVER PUT ANY GREASE BETWEEN THE ROLLERS
In aluminium hulls one should carefully select the rudder
stock material. The most obvious and wise choice will be to use the same
material as the hull, as there will be no chance of electrolysis between the
hull and the rudder stock. Due to the insulating construction of the Jefa
bearings it's possible to use an other material for the rudder stock (like
stainless steel or carbon), but this means that a lot of extra arrangements
will have to be taken to make sure there will be no electrolysis. (Please
have a look on our electrolysis page).
The rudder blade will have to be made of glass fibre or carbon and a simple
current leak in, for example the autopilot drive, will connect the hull to
the shaft and cause big electrolysis problems.
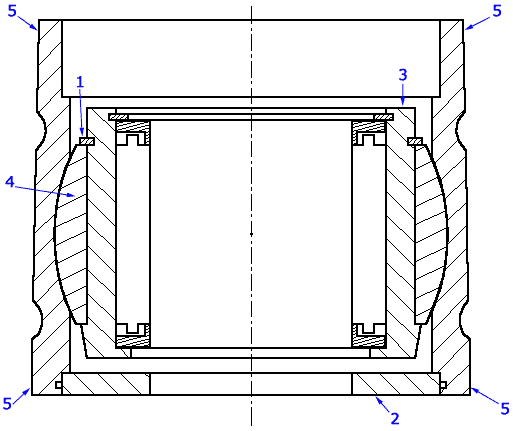
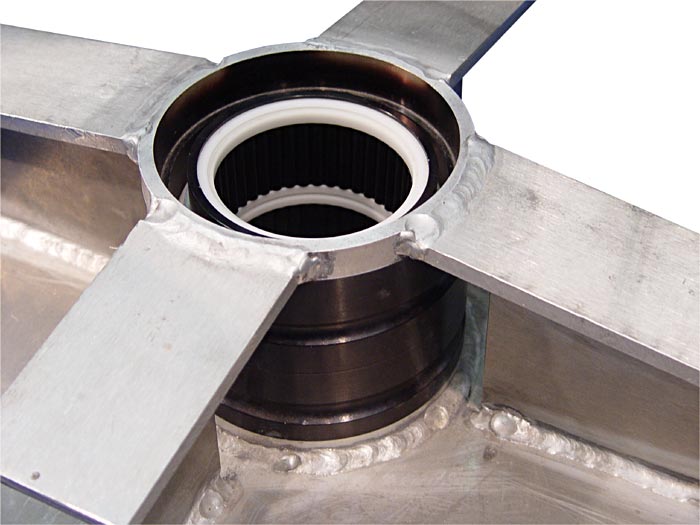
We advise to only use the self-aligning heavy duty type
roller bearing (type 43.... with option WELD) in aluminium hulls. These
bearings can be welded directly into the hull saving precious installation
time. Standard (non self-aligning) bottom bearings can only be installed by
gluing them in a rudder tube in combination with the rudder stock mounted in the
vessel, a time consuming and costly operation. As the tolerance
between the bearings and shaft is only a couple of hundreds of millimetres,
one can't afford any misalignment between the bearings and rudder shaft.
Our suggested mounting procedure for Jefa rudder systems in aluminium hulls:
After the turning of the hull and the joining with the deck locate the rotational axis of the rudder. Align and cut the hole for the lower bearing as accurate as possible to the outside diameter of the bottom bearing.
As the delrin ball inside the bottom bearing will meld during the welding process, it's vital to disassemble the bottom bearing according to following instructions:
|
 |
|
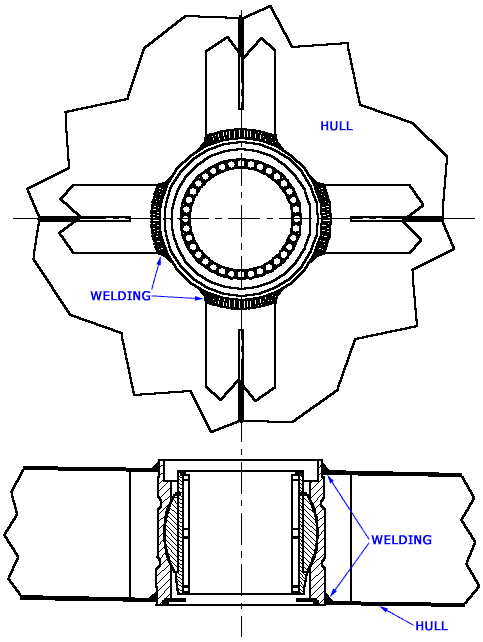 |
After the bearing housing has cooled down, you should first grind and clean the inside register of the bottom bearing where the tube will be entered. Now you can assemble the bearing again. First put the ball parts back in the housing. You could put a bit of grease or silicone paste on the in- and outside off the ball. Carefully push the inner housing back up, when this doesn't go smooth, don't hammer it in. Try to align the ball parts better and play a bit with them. Put the circlip back on the top and click the delrin ring in the bottom of the bearing. take care that no grease has entered the inner housing and check if the rollers run freely.
If the ship is wheel steered, try to calculate the height of the tiller arm or quadrant of the boat. Measure the tube length, bearing in mind that the top of the tube has to clear 70 mm from the bottom of the tiller arm or quadrant. The top of the tube has to be located more than 100 mm above the final waterline. (If you have any doubts, please consult our sealing system page). Please note that when the top of the sealing system is underneath the waterline, a potential dangerous situation is created and an alternative steering arrangement should be considered.
Now that the tube is on it's final length it can be assembled with the bottom bearing. Grind and clean the the part of the tube that will go into the bottom bearing carefully. Put a small film of polyurethane sealant compound around the outside bottom edge of the rudder tube just prior to fitting it into the lower bearing. Do your best not to gum up the inside of the bearing with sealant, or contaminate any of the surfaces with sealant. Make sure that the joint between the rudder tube and the bearing is well sealed.
Cut the hole for the top bearing in oversize, so you will have some adjustment for the alignment of the rudderstock.
Slide the plastic spacer ring over the top of the stock so that it rests on the top of the rudder blade. Remove the key, if present, out of the keyway as it could damage the rollers. Don't forget to put the gaiter (if used) over the tube as there will be no possibility any more to mount it.
We are now ready to slide the rudder shaft into the boat. Run the rudder stock carefully, while rotating, up into the top deck hole. Secure the rudder blade in position and slide the top bearing over the shaft while rotating. If the angle of the mounting surface of the top bearing is more than a couple of degrees out, produce a wig (teak or delrin) to adjust the top surface angle.
Carefully align the rudder to it's theoretical position using wigs between the top bearing and the holes in the hull. Please note that if the keel isn't at its optimal angle under the ship it could be wise to also misalign the rudder to accommodate the same angle as the keel, as every misalignment between the rudder and keel will be very obvious when standing behind the ship.
Drill the appropriate holes for the top bearing. Remove the bearing, clean the bottom on the flange and deck and put a proper film of polyurethane sealant underneath the flange of the top bearing. If your rudder system doesn't consist of self-aligning bearings it's very important to not just bolt down the top bearing on the deck as the surface of the deck and the flange of the bearing will always be misaligned a bit. One can use the sealant to adjust for this small misalignment. Tighten the bolts lightly, just as far as the sealant starts to be pressed from underneath the flange. Wait at least 24 hours for the sealant to harden, before you finally tighten the bolts permanently. If a self-aligning type of top bearing is used, one can tighten the bolts permanently as the bearing will align itself to the rudder shaft.
|
|
Now the vertical locking can be installed. There are two
ways of vertical locking: A rudder head or locking ring on top of the top
bearing and the use of a top bearing with an integrated vertical roller bearing
(type 4....Z).
In both cases one should use grease or anti seize paste on the tread of the
set screws of the locking rings, especially when used above deck. Tighten
the screws when the shaft is at the correct height. Remove the screws, drop
the shaft a bit, and
drill a small hole a few millimetres deep so the set screws will enter the
shaft a bit. This will make sure that the rudder will never drop down.
We hope these guidelines will provide a trouble free installation of the Jefa rudder system. If you have questions or problems please mail them to us at info@jefa.com.
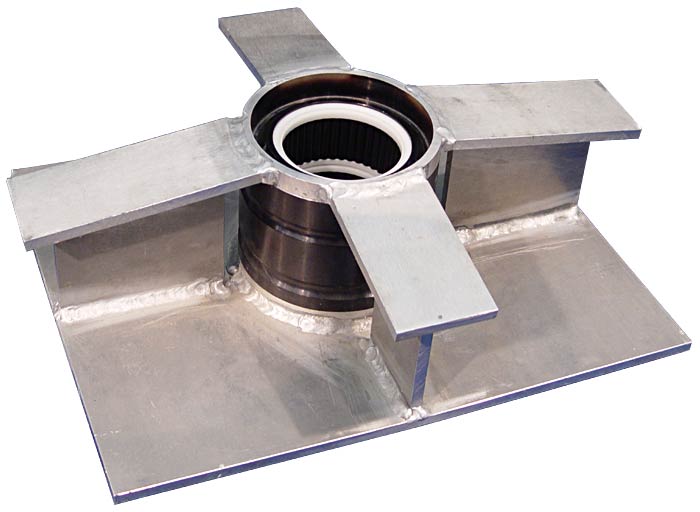
43000 series bearing welded into the hull of a Judel & Vrolijk 40 triple
rudder boat.
![]()